Friday, September 23, 2011

Chocolate Nutella Cupcakes


So these were sort of an experiment... and typical of an experiment they gave me lots of new ideas! They came out pretty tasty as is but I now have so many ideas to make them even better.

Late last night, while watching Mad Men and enjoying a glass of wine, I suddenly NEEDED a late night chocolate snack. I went to the kitchen and looked around but nothing I found seemed good enough. Thanks to Club:BAKED I have lots and LOTS of ingredients. I then went to trusty old Google and asked him what I should make. I stumbled across a few different chocolate cupcake recipes and decided to experiment. 

 
Chocolate Nutella Cupcakes:
•           8 tablespoons (1 stick) unsalted butter, cut into 4 pieces
•           2 ounces bittersweet chocolate, chopped
•           1/4 cup Nutella
•           1/2 cup (1 1/2 oz) Dutch-processed cocoa
•           3/4 cup (3 3/4 oz) unbleached all-purpose flour
•           1/2 teaspoon baking soda
•           3/4 teaspoon baking powder
•           2 large eggs
•           3/4 cup (5 1/4 oz) sugar
•           1 teaspoon vanilla extract
•           1/2 teaspoon table salt
•           1/2 cup (4 oz) sour cream

1. Pre-heat the oven to 350 degrees. Line standard-sized muffin pan (1/2 cup capacity) with baking-cup liners. This makes about 12 cupcakes.
2. Combine butter, chocolate, nutella and cocoa in medium heatproof bowl. Set bowl over saucepan containing barely simmering water; heat mixture until butter and chocolate are melted and whisk until smooth and fully combined. Set aside to cool until just warm to touch.
3. Whisk flour, baking soda and baking powder in small bowl to combine
4. Whisk eggs in second medium bowl to combine; add sugar, vanilla and salt and whisk until fully incorporated. Add cooled chocolate mixture and whisk until combined. Sift about one-third of flour mixture over chocolate mixture and whisk until combined; whisk in sour cream until combined; then sift in remaining flour mixture and whisk batter until it is homogenous and thick.
5. Divide batter evenly among muffin pan cups. Bake until skewer inserted into center of cupcakes comes out clean, 18-20 minutes.
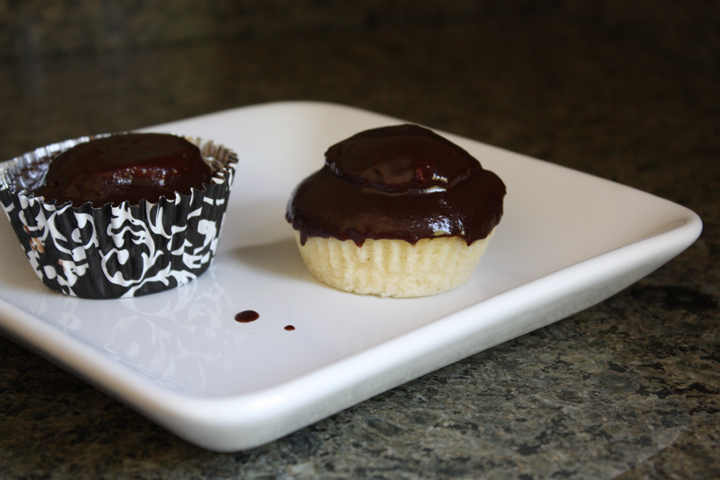
6. Cool cupcakes in muffin pan on wire rack until cool enough to handle, about 15 minutes. Carefully lift each cupcake from muffin pan and set on wire rack. Cool to room temperature. (I left mine over night but I really wish I hadn't) 

 
I ate a cupcake RIGHT away. I broke it up into a few pieces to let it cool but WOW it was delicious! The top was almost crispy while the inside was warm, light and fluffy! Mmmm! It is funny how the consistency changes so much once it cools. The cake was still tasty but it was much denser this morning compared to the night before.
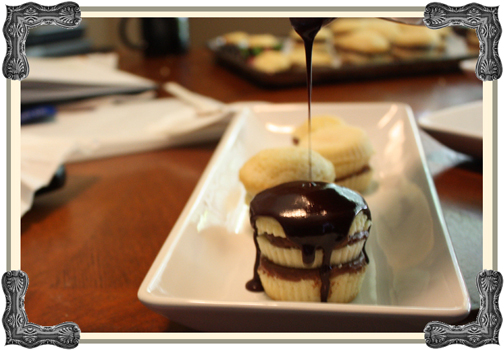
Anyway I had to come up with some sort of a topping so I decided to make a dark chocolate peanut butter ganche.


Dark Chocolate Peanut Butter Ganche:
•           5 ounces unsweetened chocolate, chopped
•           1/4 cup (1/2 stick) chilled butter, cut into 1/2-inch cubes
•           1 teaspoon vanilla extract
•           3/4 cup heavy whipping cream
•           3/4 cup sugar
•           2 heaping table spoons of peanut butter

Place chopped chocolate, butter, peanut butter and vanilla in medium bowl. Bring cream and sugar to boil in medium saucepan, stirring to dissolve sugar. Carefully pour hot cream mixture into bowl with chocolate. Let stand 1 minute. Whisk until melted and smooth. Dip the cupcakes into the ganche.

 The ganche matched the cupcakes perfectly and they are very delicious! They are the kind of cupcakes that should be enjoyed with a glass of milk... except I hate milk haha.

As for next time I would love to top these with a fresh cut strawberries and sugar and perhaps fill them with a regular dark chocolate ganche. I think that would really take these to the next level.

Another idea I have is to, again fill them with the peanut butter chocolate ganche but top them with a nutella cream cheese frosting. Yum!

I cannot wait to try these new ideas but for now I am going to go eat another one!

Thursday, September 15, 2011

Mini Mexican Hot Chocolate Cupcakes

 
Mexican Hot Chocolate is often made with spices like cinnamon and chilies. A slightly spicy hot cocoa is a tradition passed down form the Aztecs. These mini cupcakes are inspired from that same chocolate spice drink.

 I have noticed many variations of these cupcakes popping up lately but something about this one in particular caught my eye. Maybe it was the delicious chocolate cake or the cinnamon cream cheese frosting, no matter what it was I am glad I chose it!


I felt that the mini cupcakes looked a bit plain after I frosted them so I decided to add dark chocolate shavings.

 Using a potato peeler worked extremely well to create little chocolate shavings that fit perfectly on top of each cake.


 All though this picture shows a bit taken out of the cake they really are bite size. You can just pop the whole thing in your mouth.


 The recipe calls for 1/4 teaspoon of cayenne pepper but you could probably add a bit more if you want it to have a good spicy kick. With just 1/4 teaspoon there is a light zing but they are not spicy by any means.


I fell in love with this recipe! I plan to make it again and again and again! 

Mini Mexican Hot Chocolate Cupcakes
  • 3/4 cups plus 2 tablespoons all-purpose flour
  • 1 cup sugar
  • 1/4 cup plus 2 tablespoons good cocoa powder
  • 1 teaspoon cinnamon
  • 1/4 teaspoon cayenne pepper
  • 1 teaspoon baking soda
  • 1/2  teaspoon baking powder
  • 1/2  teaspoon kosher salt
  • 1/2  cup buttermilk, shaken
  • 1/4  cup vegetable oil
  • 1 extra-large egg, at room temperature
  • 1/2 teaspoon pure vanilla extract
  • 1/2 cup freshly brewed hot coffee
Preheat the oven to 350°. Line 24 mini baking cups with paper liners. (This recipe made 48 for me)
Sift the first eight ingredients into the bowl of a stand mixer. Whisk to make sure all ingredients are combined.
In another bowl, combine the buttermilk, oil, eggs, and vanilla.
With the mixer on low, slowly add the wet ingredients to the dry and mix until just combined. Keeping the mixer on low, add the coffee and stir to combine. Scrape bowl to make sure everything is incorporated.
Fill muffin cups halfway (I filled them 3/4's full) and bake  for 10-15 minutes (mine cooked in 10) or till cake tester comes out clean. Cakes will be soft and airy.


Cinnamon Cream Cheese Frosting
  • 1 8oz. package room temperature cream cheese
  • 1/4 cup (1/2 stick) room temperature butter
  • 1-2 cups confectioner’s sugar (I used only 1 cup)
  • 1/4 teaspoon cinnamon (I used 1/2 teaspoon)
Mix cream cheese and butter with hand mixer till fully combined. Add cinnamon. Slowly add confectioner’s sugar till desired sweetness is reached and frosting is smooth.

Top with chocolate shavings or any other preferred topping and enjoy!

Bananas Foster Fritters

Bananas Foster Fritters, from Baked Explorations, was this weeks Club:BAKED recipe. I was pleasantly surprised, I expected this to be a BIG pain to make but besides opening my cupboard and realizing I was completely out of brown sugar (an having to make a quick run to the store), these were pretty easy and quick to make. Having fried the doughnuts not that long ago I was much more confident when it came to frying these puppies!

 
Here's how they came out! Over all the turned out pretty well.


 I am not the biggest fan of banana in any other form then a banana 
(except banana chocolate chip bread, yum!). So if I ever make these again I may try another fruit. I've been thinking apple pie filling would probably create some tasty apple fritters.


The dipping sauce was good too except when I went to pour the ingredients in I accidentally dumped WAY to much cinnamon in, luckily it came out better then I thought it would.


 Over all it was a good recipe and I am glad to be able to say I did it. Every recipe we do, I become just a little more confident in my baking abilities. Now I am off to go bake some Mexican Hot Chocolate Cupcakes for the potluck at work today. Wish me luck, I will post about it later today.

To see how the everyone's Banana Foster Fritters came out check out Club:BAKED
Thank you Stephanie for this recipe! To see how her's turned out check out Ice Cream Before Dinner!

Thursday, September 1, 2011

Boston Cream Pie Cake - Club:BAKED

So the Sunday Night Cake for Club:BAKED came and went and I completely missed it! I was too busy and distracted and it passed me by! I didn't even notice until a week later. Thanks to my lovely sister the Ginger Snap Girl I didn't miss this weeks recipe, Boston Cream Pie Cake!

So I have to be honest. The only Boston Cream Pie I have had before was out of a Yoplait container haha, but it just happens to be my favorite flavor! Well, I know this is a cake and not the real Boston Cream Pie, but I love it anyway! It was delicious!

Anyway, I have decided that from now on I am going to increase the photos and decrease the talking so here you go...

Right away I got the feeling that the cupcake idea wasn't going to work out so well....


 I had originally planned to fill the cupcakes with the cream and top them with the chocolate glaze but after seeing them I wasn't too sure how that would work out.

 New Plan! Mini Cakes!

 Pouring the glaze... I went a bit Glaze Crazy!


 I made all different sizes... 4 layer, 3 layer and sandwich size


 I know it's hard to tell but each layer has an inner cream center while the chocolate cream outer circle.


You can see the cream center a bit better once you get inside but I just could not get the white cream to photograph well against the white cake.


 I know they are messy and that they aren't the prettiest cakes in the world but they do taste good!


 I didn't want to give up on the cupcake idea completely so I made to following my original plan.


 And they came out better then I had thought they would.


 Once the wrapper was peeled away they started to look kind of cute but they left behind a VERY messy cupcake wrapper.


 There is the cream filling, once again there is the regular pastry cream in there as well you just can't see it yet.


 I had a lot of variations haha


Thank you Brooke for picking this wonderful recipe!
To see how the Boston Cream Pie cake came out for Brooke, check out her blog Brookes Bountiful Kitchen.
To see how all the other Club:BAKED bloggers fared, click here: Club:BAKED.

Monday, August 1, 2011

Chocolate Mint Thumbprint Cookies - Club:BAKED

Once again... I waited until the very last minute but I enjoyed making these cookies because they weren't extremely complicated and they didn't require me doing a bunch of little steps that I have never done before. I began making them last night and as soon as I finished the dough and put it in the fridge I realized that I didn't have any heavy cream. I ended up leaving the dough in the fridge all night and started again this morning.

After picking up the heavy cream I got back to work, with Luis here to help me! I took a regular spoon and scooped out a hunk of dough and then rolled it into a ball. I guess I made mine a bit big because I only ended up with 34 cookies. Anyway we rolled them in the sugar and set them out on the tray. I made the thumbprint with my thumb. I have never made thumbprints before so I wanted to get the full experience. 

This is them before baking. I was a bit worried because they weren't looking too attractive.


But they came out okay. After they came out of the oven and cooled completely I added my dark chocolate peppermint filling (instead of the white chocolate filling in the recipe) because I really really REALLY do NOT like white chocolate.I just replaced the white chocolate with 70% dark chocolate. Yummy! :) (I must say though that anyone who did not enjoy the dark chocolate topping from the last recipe would not have liked my filling)


This is how they came out after about 25 minutes in the fridge...


 I really enjoyed these little guys! My mom and Luis seemed to really enjoy them too!


Thank you Jamie for choosing this delicious recipe! To check out how hers turned out click here Random acts of food! To see how all the other bakers did go here Club:BAKED.


Now I am off to go eat some more! Mmmm!

Friday, July 15, 2011

Farm Stand Buttermilk Doughnuts Two Ways - Club:BAKED

To be honest, the very first time I found out that Farm Stand Buttermilk Doughnuts was our second expedition in Club: BAKED ... I was terrified. I am a doughnut fan but I have never even dreamed of making homemade doughnuts before. I hadn't ever fried anything before and I have never made any type of dough other then cookie dough. I almost wanted to quit! I thought, "I am WAY too inexperienced for this baking group, maybe I should start with a more basic baking book." 


I am glad I didn't quit! Making these little treats was not as hard as I imagined. In fact the whole process went incredibly smoothly because... my wonderful boyfriend helped me out haha. We have been together over 6 years now and he is very good at keeping my stress level low. He also know that when I say "UGH I HATE BAKING!" it really just means "help I am lost!" When he first heard me utter that statement he popped up and took over photographer duties as well as became my soothing mentor and assistant fryer. 

Well back to the doughnuts...


I don't have any cookie cutters or doughnut cutters or any thing like that at all so I took a metal insulated cup that looked to be about 3 1/4 inches in diameter and used this to make the main doughnut ring. I chose this cup because the rim was thin which made cutting very easy. For the hole I used the smaller side of a double sided shot glass. It was maybe an inch in diameter and made the perfect size hole for my doughnuts.


I forgot to say that I had to add extra buttermilk to my dough. I noticed it was pretty dry, not sticky like the recipe described, so I just added in a bit more buttermilk until the dough looked right.

Anyway, I was very very nervous about frying these doughnuts and as I watched the temperature on the thermometer go up and up and up my nervousness increased, but finally it was time. Once I got them in the oil it was actually pretty fun to watch them puff up and brown.

I ended up with about 16 large doughnuts and 20 doughnut holes (which is way way way to many, I really should have made only half the recipe).

While I was waiting for the oil to heat up I began making the toppings. I first made the chocolate topping, then I got started on the vanilla. I was panicking about not having all the toppings made in time and I made a HUGE mistake. I used regular sugar instead of powdered sugar and didn't even realize until I was mixing it all together and it didn't look right.
Well instead of starting over, I just trashed it. I am not a vanilla fan anyway so I really didn't mind. After I though out my vanilla mistake I mixed up the Cinnamon sugar topping and by then the oil was hot and ready.

Once I began topping my doughnuts and doughnut holes I realized another mistake I made... I didn't half the recipes so I ended up with way more toppings than what could cover even my excessive amount of doughnuts. Luckily I really like having Cinnamon sugar toast so I saved that mixture in a baggy and I also REALLY love the chocolate topping so I saved the left overs in a bowl in the refrigerator. This will probably sound really strange but I have been enjoying a spoon full of this cool chocolate treat with a glass of wine at night.

 Enough of my random ramblings... here is my final result!


 Both my boyfriend and my family really enjoyed these Farm Stand Buttermilk Doughnuts.


My boyfriend really enjoyed them dipped in milk.


I found a great way to use the left overs. Obviously, they just aren't as good after the first day because the loose there fresh crispyness but the taste DELICIOUS dipped in coffee! Every morning since I made them I have been popping a large doughnut in the microwave for about 30 seconds and then I dip it into my morning coffee, it is SOOOO good! The chocolate topped doughnuts work best as coffee dippers and I am really sad that I am all out of doughnuts.

Awesome pick Gloria, and I am not just saying that because you're my sister! For the full recipe check out her blog The Ginger Snap Girl! To see how the other bakers did check out Club: BAKED.

:)

P.S. I keep hearing that people had bad experiences with the chocolate topping and boy am I sorry, mine was PERFECT and truly the only topping I would reuse.

How I made it:
 4.5-5 ounces of Lindt 70% Cocoa coarsely chopped
1/2 cup heavy cream
2 tablespoons unsalted butter

I made mine way before the oil was ready so mine cooled off a bit so I zapped it in the microwave but it came out thick and creamy and deliciously dark! I am a HUGE dark chocolate fan and I know a lot of people aren't so I would imagine replacing the dark bar for a 50% or a milk chocolate would work just as well.

Friday, July 1, 2011

NY Style Crumb Cake - I finally made it!

I've been so busy lately that for the first time in my life I became a procrastinator... I honestly don't know what I was thinking putting off this delicious crumb cake for so long!

To be honesty, I wasn't exactly excited when I saw that New York Style Crumb Cake was the first recipe we would be making for Club:BAKED because I am a chocolate fanatic so I always chose CHOCOLATE over anything else. I was a bit nervous when I realized that Baked Explorations was not filled with tons of extra chocolatey treats... NY Style Crumb Cake changed my mind. Don't get me wrong I still LOVE chocolate but now I am excited about all the Baked Exploration recipes.

Well anyway... I had every intention to bake this crumb cake weeks ago because I cannot STAND waiting till the last minute. I am an 'always early' person, so a few weeks ago I bought all the ingredients I needed to bake this crumb cake but life threw a curve ball at me.

I recently graduated from college and I have been applying to jobs like a mad women, but up until now I hadn't heard back from anyone. Well right around the time I purchased all the ingredients for this recipe one of the jobs called me back! The most promising and high paying job in fact. So my last few weeks have been consumed with interviews and paperwork and online courses and finger printing and background checks and such and well... I used up my sour cream on nachos and almost completely forgot about this weeks recipe.

If you have read any of my posts before now you probably already know that I did not go to the grocery store today to buy more sour cream but I instead came up with a substitute. (I should probably change my name to Totally Substituted) Well I rummaged through my fridge and decided that I could substitute the sour cream for strained yogurt.  Of course I didn't have enough vanilla yogurt ( a little less than a cup) but you know what I did have? Yoplait's Strawberry Shortcake yogurt... so I added that in as well with a little bit of baking soda to thicken the yogurt up. ( I also had Key Lime Pie flavor but I figured Strawberry Shortcake would blend a little better). To my surprise... it worked out! You could taste a hit a strawberry in the raw batter but once it was baked you couldn't even notice.

Ready for the oven!

In the oven


My crumb cake came out so much better than I ever imagined! Both my mother and niece enjoyed it too.

Fresh out!


I am so excited about that this crumb topping... all the other crumb toppings I have made before sink down to the bottom but this one help up wonderfully!


Oh one more thing... I decided to a Cinnamon and brown sugar filling. I mixed together a version of the crumble topping without adding the flour and I added it half way through pouring the cake mix then added the rest of the cake mix on top of it. I am so glad I did! It is one of my favorite aspects of the cake!


I would say over all this was absolutely a success! I can't wait to bake the Farm Stand Buttermilk Donuts Three Ways from Baked Explorations.

Check out all the other bloggers crumb cakes here!

:)